


Peeling paint on a ceiling can be an eyesore that diminishes the appearance of your home and often signals underlying issues that need addressing.
Whether it’s due to moisture problems, poor surface preparation, or simply old age, peeling paint needs prompt attention to prevent further damage and restore the beauty of your ceiling.
This comprehensive guide will walk you through fixing peeling paint on your ceiling, from identifying the root cause to properly preparing and repainting the surface.
We’ll also cover the tools, materials, and best practices to ensure your ceiling looks fresh and flawless again.
1. Why Does Ceiling Paint Peel?
Before we go into the fixing process properly, you must understand why paint peels from ceilings in the first place.
There are several common causes of peeling paint on ceilings.
1. Damage From Moisture
Moisture is one of the leading causes of paint peeling, especially on ceilings in rooms prone to humidity, like bathrooms, kitchens, or laundry rooms.
Sometimes, water leaks from roofs or plumbing errors can also lead to the deterioration of the paint.
When moisture seeps through the ceiling, it compromises the bond between the paint and the surface, leading to bubbling, blistering, and eventually peeling.
2. Poor Surface Preparation
Proper surface preparation is important before painting. So, if the surface wasn’t properly prepared before painting, the paint may peel prematurely.
The paint may fail to adhere properly to the surface without cleaning, sanding, or applying a primer, causing it to peel over time.
3. Using the Wrong Paint Type
Certain types of paint are more suitable for different environments.
For instance, flat or matte paints used in high-humidity areas may absorb moisture, leading to peeling.
You must use moisture-resistant or semi-gloss paints in places like bathrooms or kitchens.
4. Age of the Paint
Understand that over time, all paint eventually wears out. If the paint on your ceiling is old and deteriorating, it may lose its adhesion and begin to peel.
So, regular maintenance and repainting are necessary to maintain a pristine finish.
5. Temperature Fluctuations
Frequent temperature changes in your home can cause the materials on your ceiling to expand and contract, weakening the paint’s bond and causing it to peel.
2. Tools and Materials You’ll Need To Fix Peeling Paint on Your Ceiling
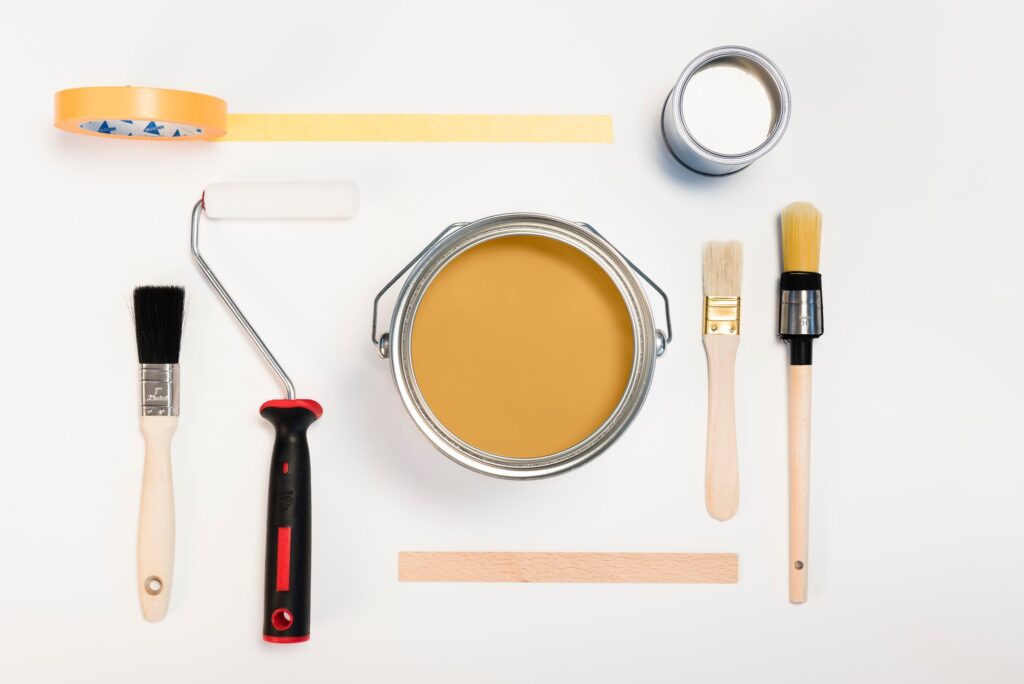
Before starting the project, make sure you have all the tools and materials required to fix peeling paint on your ceiling.
Here’s a list of essentials,
- Drop cloth or plastic sheeting (to protect your furniture and floors)
- Ladder or step stool
- Scraper or putty knife (to remove loose paint)
- Sandpaper (medium and fine-grit)
- Spackle or joint compound
- Putty knife (for applying spackle)
- Primer (stain-blocking and moisture-resistant if needed)
- Bucket of Paint (use the appropriate type based on the room’s environment)
- Paintbrushes and rollers
- Painter’s tape
- Cleaning supplies (bucket, sponge, detergent)
- Safety glasses and dust mask
3. The Step-by-Step Guide to Fixing Peeling Paint on Your Ceiling
Now that you know the common causes of peeling paint and have gathered your materials, it’s time to get to work.
Follow these steps for a flawless finish.
Step 1. Prepare the Room
Before you begin working on the ceiling, you must protect your furniture and floors.
Lay down your drop cloths or plastic sheeting to catch falling debris, paint chips, and drips. Move your furniture out of the way or outside, or cover it to avoid damage.
Step 2. Identify and Address the Root Cause Of The Peeling
To successfully fix peeling paint, you must first identify the root cause to prevent the problem from recurring.
You must take the time to determine what caused the paint to peel, whether it’s moisture, poor adhesion, or temperature fluctuations.
- If moisture is the cause
Locate the source of the moisture. If it’s due to high humidity, improve ventilation by installing a fan or dehumidifier.
If it’s from your roof or plumbing leak, you should have the issue fixed before proceeding.
- If poor surface preparation or old paint is the cause
You can proceed with surface preparation and repainting, but make sure you do a proper surface preparation this time before you repaint.
Step 3. Scrape and Remove The Loose Paint
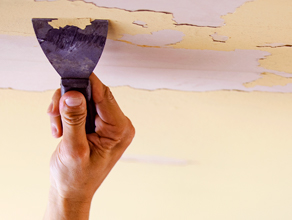
Using a scraper or putty knife, gently remove all the loose or peeling paint from the ceiling.
Be careful not to damage the underlying surface. Aim to remove any paint that’s visibly peeling or feels like it may detach easily.
If necessary, sand the edges of the remaining paint to create a smooth transition between the damaged and intact areas.
Step 4. Sand the Affected Surface
Once you’ve removed all loose paint, sand the affected surface of the ceiling to ensure it’s smooth and even.
Start with medium-grit sandpaper to smooth out rough patches, then finish with fine-grit sandpaper for a more refined surface.
Sanding also helps the new paint adhere better.
Step 5. Clean the Ceiling
After sanding, you must thoroughly clean the ceiling to remove dust, dirt, and any residues affecting paint adhesion.
You can use a sponge and a mild detergent to wipe the area. Let the ceiling dry completely before moving on to the next step.
Step 6. Repair All The Imperfections On The Ceiling
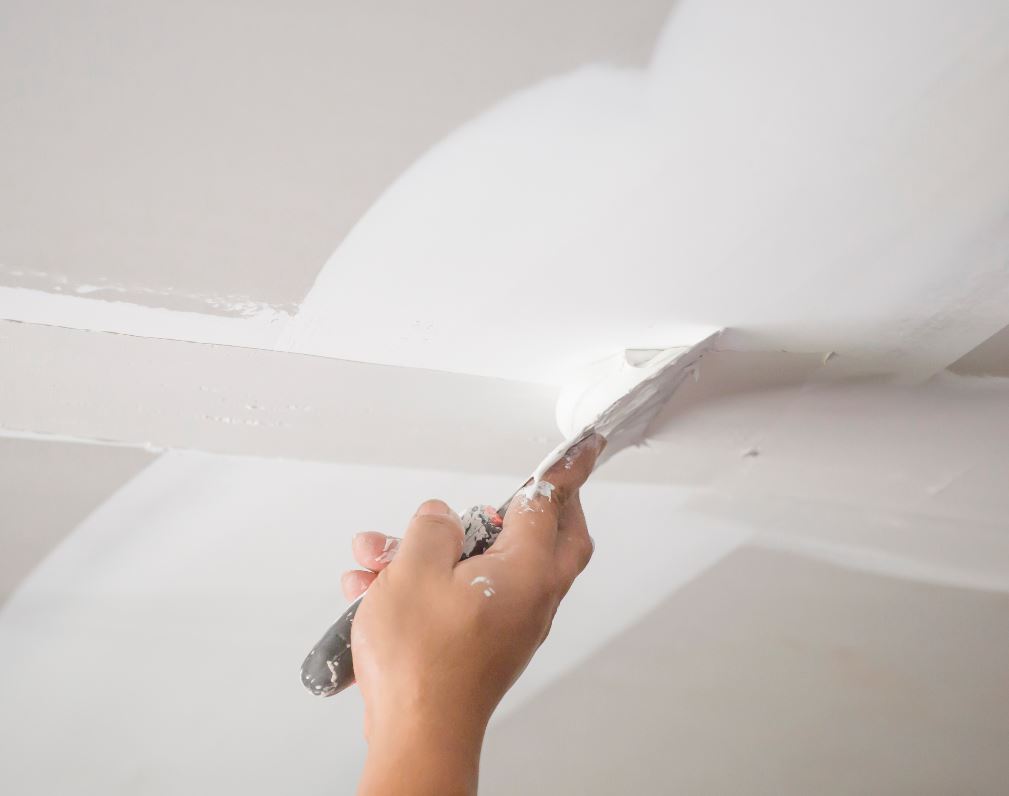
If there are cracks, holes, or dents in the ceiling, use a spackle or joint compound to fill them. Apply a small amount of spackle to the damaged area using a putty knife and smooth it out.
Let it dry according to the manufacturer’s instructions and then sand it to blend with the rest of the ceiling.
Step 7. Apply a High-Quality Primer
For areas prone to moisture or where stains are present, opt for a moisture-resistant or stain-blocking primer.
Apply the primer evenly using your roller or brush and allow it to dry completely before painting.
Step 8. Repaint the Ceiling
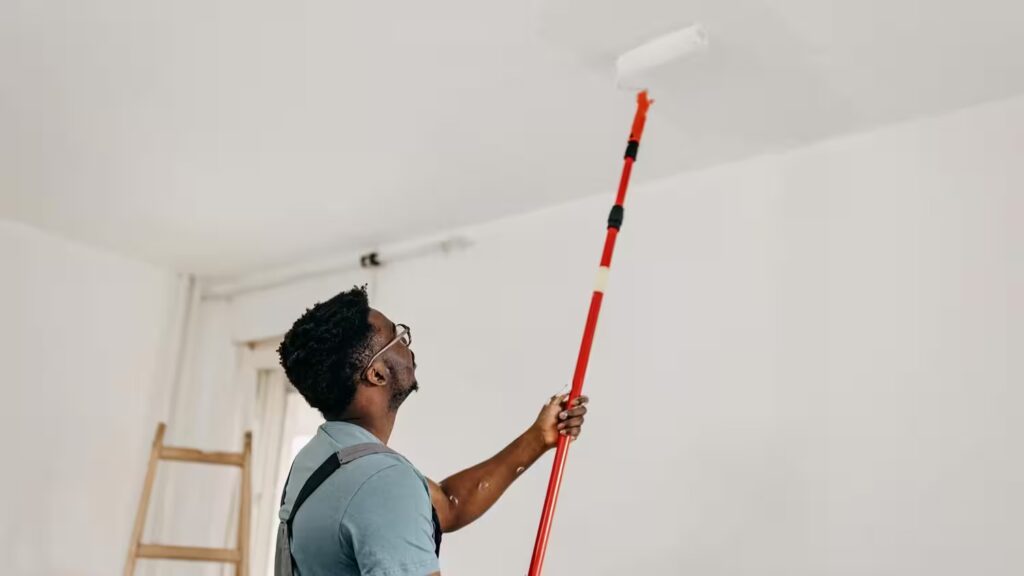
Once the primer has dried, you can begin repainting the ceiling. Use a roller for large areas and a brush for edges and corners.
Apply two coats of paint for better coverage and durability, allowing each coat to dry very well before applying the next.
Be sure to choose a paint suitable for the room’s environment. For moisture-prone areas like bathrooms and kitchens, use a semi-gloss or satin finish.
4. Tips for Preventing Future Peeling Paint on Your Ceiling
To ensure your freshly painted ceiling remains in good condition, follow these tips to prevent future peeling paint.
1. Improve The Room’s Ventilation
In moisture-prone rooms, proper ventilation is key to preventing paint from peeling. Install exhaust fans in bathrooms and kitchens to reduce humidity.
Opening windows or using a dehumidifier can also help.
2. Use the Right Paint
Always choose high-quality paint that’s appropriate for the room. For high-humidity areas, opt for moisture-resistant paints such as semi-gloss or satin finishes.
These paints are more durable and resistant to moisture buildup.
3. Maintain Your Home Regularly
Regularly check for signs of leaks or moisture buildup in your home. Address any issues as soon as possible to avoid further damage to your ceiling and paint.
Additionally, keep an eye on the condition of your paint, especially in areas prone to wear and tear, and repaint every 5–7 years as needed.
4. Always Prepare Surfaces Properly
Surface preparation is essential for a long-lasting paint job. Always clean, sand, and prime the surface before painting.
Skipping any of these steps can lead to poor adhesion and premature peeling.
5. When to Call a Professional?
While fixing peeling paint on your ceiling can be a DIY project, there are times when it’s best to call a professional.
If the peeling is extensive, the ceiling is in poor condition, or the root cause is difficult to identify, seeking the help of a professional painter or contractor can ensure the job is done right.
Professional painters have all the tools and experience needed to address complex issues, such as mold or extensive moisture damage, and provide long-lasting results.
6. Conclusion
Learning how to Fix peeling paint on your ceiling is a manageable task that can restore the beauty and integrity of your home’s interior.
But If the job seems too big or complex, don’t hesitate to call a professional painter near you to handle the repairs.
With the right approach, your ceiling will be as good as new in no time!
I hope this was helpful.


