


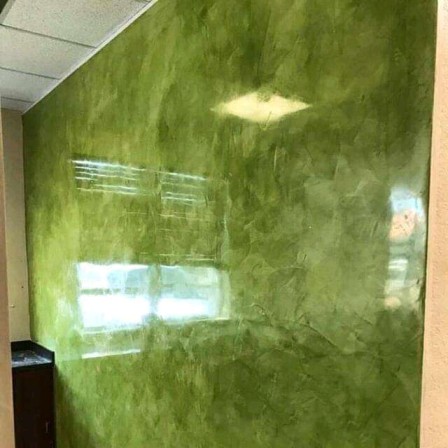
Stucco paint, also known as Venetian plaster, is a luxurious wall finish used for centuries to create a sleek, marble-like surface.
Originating in ancient Roman and Renaissance architecture, Stucco paint has become a popular choice in modern interior design due to its stunning aesthetic, versatility, and durability.
It offers a timeless, sophisticated look, with various textures, finishes, and color options, making it a favorite among architects, designers, and homeowners.
If you’re interested in producing Stucco paint yourself, this guide will take you through the process, covering the necessary materials, preparation, application techniques, and tips for achieving professional results.
- What is Stucco Paint?
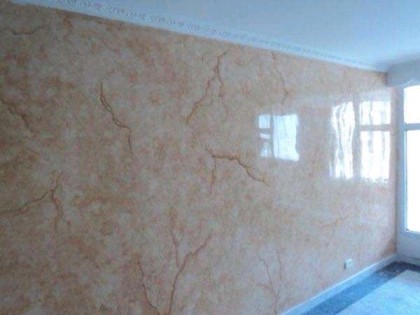
Stucco paint is a decorative finish made from lime putty and marble dust, which is applied to walls and ceilings in thin layers to mimic the appearance of polished stone or marble.
Unlike traditional paints, Venetian plaster offers a rich, textured surface that reflects light in unique ways, creating depth and dimension.
Its smooth, polished finish gives walls a natural stone-like appearance, while also allowing the surface to breathe, preventing mold growth and moisture buildup.
- What Are The Benefits of Stucco Paint?
Before we go into the production process properly, you must understand why Stucco paint is so highly valued.
Here are some benefits of stucco paint.
- Stucco Paint Has A Luxurious Aesthetic
Venetian plaster’s natural sheen and rich texture create a sophisticated, high-end look, making it ideal for upscale homes, commercial spaces, and artistic interiors.
- Stucco Paint Is Highly Durable
A properly applied stucco paint is long-lasting and resistant to cracking and fading. It can last for decades with minimal maintenance.
- Stucco Paint Is Moisture Resistant
Lime-based Venetian plaster is naturally breathable, allowing moisture to escape, which prevents the growth of mold and mildew, and makes it suitable for bathrooms and kitchens.
- Stucco Paint Is Eco-Friendly
Stucco paint is made from natural materials like lime, marble dust, and water, making it an environmentally friendly choice compared to chemical-based paints.
- Stuuco Paint Provides You With A Customizable Finish
Depending on how you apply it, stucco paint can achieve different textures, ranging from smooth, glossy surfaces to rustic, matte finishes.
It can also be tinted in a wide variety of colors.
- What Are The Materials Needed For The Production Of Stucco Paint?
Before you commence the production process, gather all the necessary materials. Here’s what you’ll need before you start.
- Slaked Lime (Calcium Hydroxide)
Slaked lime is the base for stucco paint. It’s a fine, white powder made by slaking (hydrating) quicklime with water.
This creates the smooth, creamy substance that forms the foundation of the paint.
Measurement
For a standard batch, use 10 kilograms of slaked lime.
- Marble Dust
Marble dust is a fine, powdered form of marble. It adds texture, thickness, and that classic Venetian plaster feel to the mix.
You can find it in different grades, ranging from fine to coarse.
Measurement
Add 3–5 kilograms of marble dust to 10 kilograms of slaked lime, depending on your desired texture.
- Water
Water is used to bind the slaked lime and marble dust, creating a paste-like consistency.
Measurement
Use 5–6 liters of water for the mixture, while adjusting the consistency as needed.
- Acrylic Binder (Optional)
You can add acrylic binders to your mixture to increase the durability and flexibility of the plaster, especially in high-traffic areas.
Measurement
Use about 1 liter of acrylic binder per 10 kilograms of slaked lime for added strength.
- Pigments (Optional)
You can add natural or synthetic pigments to tint the plaster to your desired color. Pigments come in powder or paste form and you should thoroughly mix them into the base.
Measurement
The amount of pigment depends on the intensity of color you desire. Typically, 0.5–1 kilogram of pigment is enough for 10 kilograms of slaked lime.
- What Are The Tools Needed for Mixing Stucco Paint?
1. Large bucket
2. Electric mixer (with paddle attachment)
3. Measuring scale and container
4. Your Protective gloves and eyewear
- The Step-by-Step Process Of Producing Stucco Paint
Step 1. Prepare Your Production Space
Firstly, ensure that your workspace is clean, dust-free, and well-ventilated. Wear protective gloves, eyewear, and a dust mask to avoid inhaling fine particles.
The production process of stucco paint involves fine powders like slaked lime and marble dust, which can be hazardous if inhaled or if they come into contact with your skin.
Step 2. Measure and Mix the Slaked Lime and Marble Dust
Start by measuring 10 kilograms of slaked lime and 3–5 kilograms of marble dust (depending on your desired texture).
Place both materials into the large mixing bucket. Using your electric mixer with a paddle attachment, mix the two powders thoroughly.
Ensure the mixture is smooth and lump-free before adding water.
Step 3. Gradually Add Water
While the mixer is running on low speed, slowly add 5–6 liters of water to the powder mixture. You must add the water gradually to prevent the formation of lumps.
Continue mixing until the plaster reaches a smooth, thick, paste-like consistency. The texture should be similar to that of cake batter.
If the mixture is too thick, you can add a little more water until you achieve your desired consistency.
Step 4. Add Your Acrylic Binder (Optional)
If you’re aiming for a more durable finish, especially in areas with high traffic, you should add an acrylic binder.
Add 1 liter of binder into the mixture and mix it thoroughly. The binder will not affect the texture but will enhance the flexibility and longevity of the plaster.
Step 5. Add Your Pigment (Optional)
For a colored Venetian plaster, add your chosen pigments at this stage.
Whether using paste or powdered pigments, add them gradually, mixing continuously to achieve an even distribution of color.
Test a small amount of the mixture on a surface to see the color after drying, as Venetian plaster lightens slightly as it cures.
Step 6. Rest and Maturation
Once all ingredients are thoroughly mixed, allow the mixture to rest for at least 24 hours.
This resting period will allow the slaked lime to fully hydrate and the mixture to mature, resulting in a smoother, and more workable plaster.
- How Do You Apply Stucco Paint?
Once your stucco paint is ready, it’s time to move on to the application process.
Venetian plaster is applied in several thin layers, each carefully smoothed and polished to create its distinctive marble-like finish.
The Tools Needed For Applying Stucco Paint
1. Trowel (stainless steel with rounded edges)
2. Spatula
3. Sandpaper (fine grit)
4. Clean sponge
5. Polishing cloth
6. Burnishing tools (for high-gloss finish)
Step 1. Prepare Your Surface
Ensure your wall surface is clean, smooth, and dry. Venetian plaster is applied over a properly prepared substrate.
Any dirt, grease, or loose particles should be removed to ensure proper adhesion. For best results, prime your wall with a plaster primer designed for use with lime-based products.
Let the primer dry completely before proceeding.
Step 2. Apply Your First Coat
Using your stainless steel trowel, scoop a small amount of Venetian plaster onto the edge. Apply it to the wall using long, smooth strokes, keeping the layer as thin as possible.
The first coat is meant to create an even base, so don’t worry too much about achieving a perfect finish at this stage. The texture will smooth out in subsequent layers.
Allow the first coat to dry completely, which can take anywhere from 4 to 6 hours depending on temperature and humidity levels.
Step 3. Sand the First Coat
Once the first coat is dry, lightly sand the surface using fine-grit sandpaper (400–600 grit).
This step helps you remove any bumps or imperfections and ensures a smoother surface for the next layer. Wipe the wall with a clean, damp sponge to remove any dust from sanding.
Step 4. Apply Your Second Coat
The second coat is where the texture begins to develop.
Apply another thin layer of plaster using the trowel, but this time, use more random and varied strokes to create movement and texture.
The goal is to build up thin layers of plaster that will eventually give the surface its depth and dimension.
Allow the second coat to dry for 6–8 hours too.
Step 5. Apply Additional Coats (Optional)
For a more pronounced texture or a thicker finish, you can apply a third or even fourth coat of stucco paint.
Repeat the same process of application, sanding between coats to achieve the smoothest possible surface.
Step 6. Polishing and Burnishing
Once the final coat is dry, the surface can be polished for a smooth, glossy finish.
Using a clean trowel or a burnishing tool, press the flat edge against the surface and gently rub in a circular motion.
This action compresses the plaster, creating a highly polished, marble-like effect.
For an even higher sheen, you can buff the surface with a polishing cloth or a specialized burnishing tool.
A little elbow grease will go a long way in creating a deep, reflective shine.
Step 7. Seal the Surface
To protect the stucco paint and further enhance its longevity, you can apply a finishing wax or sealant.
This is especially important in areas where moisture may be a concern, such as bathrooms or kitchens.
The wax not only adds a protective layer but also deepens the sheen and enhances the color of the plaster.
Using a clean cloth or your spatula, apply a thin layer of wax in small, circular motions. Allow the wax to set for about 15 minutes before buffing the surface to a shine with a clean, dry cloth.
- Tips for Achieving a Professional Venetian Plaster Finish
- Work in Small Sections
Venetian plaster dries quickly, so work in small sections to ensure you have enough time to apply and smooth the plaster before it sets.
- Use a Light Touch
When burnishing the plaster, apply light pressure to avoid scratching the surface.
- Experiment with Techniques
Stucco paint is highly customizable. Experiment with different application techniques, such as layering colors or using a sponge to create a unique texture.
4. Protect the Finished Surface
Venetian plaster is durable, but it’s still prone to scratching and scuffing. Apply a protective wax or sealant to prolong its lifespan.
- Frequently Asked Questions (FAQs)
Q1. Can Stucco paint be applied to any surface?
Stucco paint works best on smooth, primed surfaces like drywall, concrete, or plasterboard. Avoid applying it to rough or porous surfaces without proper preparation.
Q2. How long does Stucco Paint take to dry?
Each coat of Venetian plaster takes 6–12 hours to dry, but the complete curing process can take up to 30 days for full hardness.
Q3. Can I paint over Venetian plaster?
Yes, but it requires sanding down the surface and applying a primer before painting.
Q4. Is Stucco paint waterproof?
Lime-based Venetian plaster is water-resistant but not entirely waterproof. For areas prone to water exposure, apply a protective sealant.
Conclusion
Producing stucco paint is a rewarding process that allows you to create stunning, one-of-a-kind wall finishes.
With the right materials, tools, and techniques, you can achieve a professional-level finish that adds elegance and sophistication to any space.
If you’re looking to enhance your home or any commercial space, Venetian plaster offers timeless beauty and unmatched durability.
By following the steps outlined in this guide, you’ll be well on your way to mastering the art of Venetian plaster and transforming your walls into works of art.

